Hi crafters and fabric lovers!
Today, I am blogging a tutorial, on how to make a washable, fabric picture frame for a 4x6" photo, using ...
FABRIC now sold on Zazzle.com ! You can visit my store at
http://zazzle.com/fabricatedframes/fabric for more sewing projects! For today, you will learn how to make a washable, sewn, fabric picture frame for a 4x6" photo, using this fat quarter fabric available at
http://www.zazzle.com/fabric_sewing_pattern_washable_photo_frame_brooch-256606757367023322
You can see all of the fabrics now offered on Zazzle at
http://zazzle.com/fabric?rf=238001022235983905
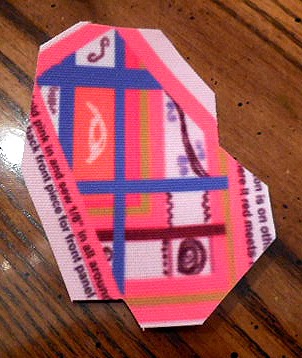
From this fat quarter fabric, you will make the picture frame below, that has my Curvy Plaid art design, formatted, and printed onto Zazzle fabric!
First let me tell you, that
Zazzle is now offering custom fabric, where people can buy fabric by the yard, by the fat quarter - what quilters and fabric stores call fabric that is divided into 4 quadrants, divided in half vertically, then again horizontally. And, you can also buy 9" x 9" SWATCHES for $6! That's truly the amazing thing, because you can do a lot with a 9x9" swatch. And, I will show you how to use Zazzle's swatch in my next blog post. As for fat quarters, usually, quilter cotton is 44-45" wide, so the fat quarters are normally 22x18". However, Zazzle is offering wider fabric, in increments of 54", 56", 58", and 60" wide, depending on the fiber type, as they offer combed cotton, polyester poplin, and linen, to name a few of their 7 fabrics available. So, the fat quarters on Zazzle are slight larger than normally sold out on the market, which means you, the customer get a lot more fabric for your buck, and artists can place more art on the fabric! Artists / designers can upload their art, and have it repeat on the field of fabric, from basic repeat which is the element or motif just repeated across and down, equally, like a grid, with the pattern's motif elements matching up evenly. Then, there are half drop repeats, horizontal, and vertical. And art can be re-sized to fit in the field, and then repeated. Plus, you can add a background color to areas which are white.
In this particular blog post, I will be showing how artists can design, and crafters can make, sewing craft projects, like this one to make a WASHABLE, SEWN, FABRIC PHOTO FRAME for a 4x6" photo, using a fat quarter of fabric. I chose the polyester poplin, but combed cotton can do the trick, to use for this project. You chose which fabric to buy, just make sure that you see the layout on that fabric before committing to buying it. A lot of art, a lot of sewing crafts, believe it or not, can fit inside a fat quarter. On this particular fat quarter, I have all of the parts, panels, to make the photo frame, and on the upper right corner, I have all of the panel part patterns to make the washable, sewn, fabric brooch, with removable bar pin back, 1 3/4". Pin backs are sold in packs of 10, 44, and 48 at AC Moore, Michaels, art, craft, and fabric stores. All of the step by step, text instructions are listed in the description area of the item link on Zazzle, plus the extra supplies & tools needed to make the frame and brooch. ALL supplies and tools can be bought at a craft, fabric, or art store, with the exception of a sewing machine. I am working on NO SEW, washable fabric frame and brooch patterns and instructions, and the brooch can be made without a sewing machine, by substituting hot glue sticks, and a low temp glue gun for the sewing machine. You "can" make the frame a "no sew" project, but you'd need to use those pointy, embroidery scissors or a good hole puncher, and make holes along the light pink line, shown on one of the frame pattern panels, 3 on both vertical sides, and 3 along the bottom part of the line - 7 holes total - just make sure that you align THAT panel, when finished, on TOP of the 3 other INSIDE finished panels, and make sure that the holes are in the same place on all 4 inside panels - you'd run that super skinny 1/16" wide ribbon through the holes, to connect the panels. You'll see what I mean in the photos below, later on in the tutorial.
You can buy this fat quarter fabric with this photo frame and brooch cut and sew at
http://www.zazzle.com/fabric_sewing_pattern_washable_photo_frame_brooch-256606757367023322
I decided to arrange and place my sewing pattern panels ON the fat quarter, with instructions ON the fabric, for making my washable, sewn, fabric picture frame for a 4x6" photo, that I invented back in 2006, with my Curvy Plaid art design, formatted to fit inside the frame front, the easel back, and strut leg front panels of the frame. If you miss a step, just refer back to this blog post, as well as the link's description section.
The art, called Curvy Plaid, is the title that I created, for what I call an abstract, feminine type of folk art, with lots of REALLY bright pinks, salmons, orange, gold, darker periwinkle / iris, aubergine like dark reddish brown, with lots of curly cues, swirls, wiggles, curves, dots, and flowers set inside the grid of a plaid layout.
The sewing pattern download printables are also available at
http://fabricatedframes.com and at
http://craftsy.com/user/2496069/pattern-store, for printable art on June Tailor washable, colorfast, inkjet printer fabric sheets, available at JoAnn Fabrics, for making my frames, brooches, house shaped potholders, and other sewing crafts, with my art formatted for panels. And a version of these crafts for this art will be posted on those sites, soon, to print onto inkjet printer fabric. I will provide links below, as well for buying supplies & tools.
Please note that I believe in saving my customers money. Soooo ...I highly suggest that you sign up for store coupons, to save up to 50% off on the supplies and tools listed here. And then you can use them for other projects. lol
Ok, so I picked the polyester poplin, fat quarter size for this project. It costs, $17.95, but you can buy the combed cotton, for $11.95, that also has a nice weight to it, prints just as beautifully. I also placed a panel of the art, almost like the one that looks like the easel back panel in the frame. I figured that you could back it with a solid colored or coordinating fabric, and make a mug rug, or a wall hanging tiny tapestry ornament textile. So, you're getting 3 sewing projects, with instructions, tools and supplies listed on the fabric, for under $12! Not to mention that Zazzle frequently offers sale promocodes from 15% to up to 50% off sometimes. You're getting a great deal, with quality fabric!
Today, we will focus on making the picture frame.
First, let me give you my legend of codes that I call, to be used to identify the frame panel parts on the fat quarter:
FFB - frame front border - you get 2, one for the front with the design / art formatted on it, one for the panel that is placed behind the FRONT FFB, called the 2nd Inside FFB
2nd Inside FFB - this panel's inside edge, the surround of what I call the "picture window" or PW for short, or area where the photo shows through, is sewn to the inside edge of the FRONT FFB. It also gets sewn to the FINISHED Frame Middle panels, or FM for short - sewing this panel to the FM makes a pocket for the photo and it's acid free, clear, sheet protector sleeve, cut to the size of the photo.
FM - 2 panels of fabric with Thermoweb Heat n Bond ironed to the back, make the Frame Middle - the frame middle, when finished, helps as a divide to make a pocket for the photo on the one side, and a pocket for the removable, slide out, easel back board, on the other side.
EB - Easel back, 2 fabric panels backed with Heat n Bond - the FM's outer edge is sewn to this panel, and the finished strut leg pocket is sewn to it, at the top of the strut leg pocket, ribbon connected the bottom right corners of the strut leg pocket to the finished easel back panel.
STRUT LEG - "strut" means leg, the leg that pitches out, to allow the frame to stand on a table or shelf. 4 fabric panels with Heat n Bond ironed to the back, make 2 finished panels, front and back, front with art formatted, for the removable, slide out strut leg board.
The removable easel back and strut leg boards are cut from mat board or cardboard, your choice. Mat board can be bought at AC Moore or Michaels, 32" x 20" at Michaels for $5 roughly, 32" x 40" at AC Moore. The strut leg board pattern is provided, and is seen INSIDE the 2nd Inside FFB panel on the fabric. For the easel back board, just cut a piece of board 4x6".
EXTRA SUPPLIES NEEDED FOR THIS FAT QUARTER SEWING PROJECT:
for frame:
Thermoweb Heat n Bond, sold by the yard at JoAnn Fabric, in 1/8th, 1/4, etc. increments - buy 1 yard - sold by the 17" wide by 5 yard roll at Michaels, $8.99 roll, use a 50% off coupon and buy for as little as $4.49 a roll - can also buy at AC Moore - comes in Ultrahold, an acid free adhesive- and Lite, great for sewing, thinner than Ultrahold, goes through your machine well. I've used Ultrahold for 15 years, well. Just use a straight pin to remove any glue that gathers around your machine needle, or to clear the hole in the needle. Heat n Bond is a paper backed, iron on, fabric adhesive, a fusible web. It is a stabilizer, and for our purposes, it adds structure to the frame parts, helps the frame stand up well, even helps keep the right angles on the frame from bunching and keeps them crisp. It's an AWESOME product! I use it for all of my frames, all of my brooches, even my washable, fabric tree ornaments. Thermoweb is exclusively used in Fabricated Frames products. Fabricated Frames is listed on Thermoweb's business friends link page.
ribbon - 7/8" or 1" wide by no shorter than 6" long, no longer than 9" long
thread - 1 roll - frame uses about 1 bobbin's worth of thread, roughly, so a small or large roll will net a frame, buy 2 rolls just in case, for also making the brooch, and other project on fabric, as well as frame.
mat board or card board - total no larger than 7" wide by 6" long for both boards.
clear, acid free, sheet protector page - cut to size of photo, use folded edge as ledge for photo to situate, so turn the page on it's side, and pin your cut lines with straight pins or use a paper cutter - can be bought in packs of 50 sheets at Target, Walmart, Walgreens - just make sure the pack reads acid free.
TOOLS NEEDED:
fabric scissors
embroidery scissors - I bought a Gingher pair for $5.40 at Michaels, using a store coupon - pointy tipped and small
paper scissors for cutting Heat n Bond, you can even cut the mat board or cardboard with them
sewing machine with zig zag and straight stitch functions
extra denim weight needles
pack of straight pins
ruler, pencil or pen
protective cutting surface
iron
hot glue sticks 2-3, low temp hot glue gun
optional: quality craft store hole puncher, rotary cuttter, rotart cutter mat
TUTORIAL BELOW, FOLLOW THE PHOTOS AND TEXT STEP BY STEP INSTRUCTIONS:
First, I washed the sizing out of the fabric, in cold water using mild detergent, and then placed the fat quarter in the dryer on low.
Iron the fabric if there are any wrinkles, however this polyester hardly needed it
NOTE: make sure your iron is on a lower setting, because of how the heat affects the polyester
Here is the fat quarter, as it was printed. The manufacturing print company, Manual Woodworkers, based in NC, serges the edge of the fat quarter, so cut the serger thread away from the pattern edges with the embroidery scissors.
Here is the bottom left corner with my ID info, my info, and a photo of a finished fabric frame with the art, showing you what a frame looks like. This particular frame had the art hand painted onto the fabric, using 2 ounce acrylic paint mixed with textile medium, for the paint to adhere to the fabric. These photos show you how to visualize the frame. I took the original frame, scanned the art on front of it, and tweaked it digitally, for this frame design, printed on the fabric.
This photo shows the 2 frame front border panel patterns with the text instructins on and around the panels - the strut leg board pattern is INSIDE the 2nd Inside FFB on the right. Just trace around and transfer the outer edge lines onto mat board or cardboard, and cut the board out. You may want to print this design onto the smoother, combed cotton, so the text shows better. If you are a designer or artist, and are thinking of making your own cut and sew sewing pattern onto this fabric, you should learn from my mistake, and make sure that you use a contrasting color for the text, and make sure that the font size is 18 or larger. I will be rearranging my Curvy Plaid frame and brooch cut and sew, to reflect these changes :D
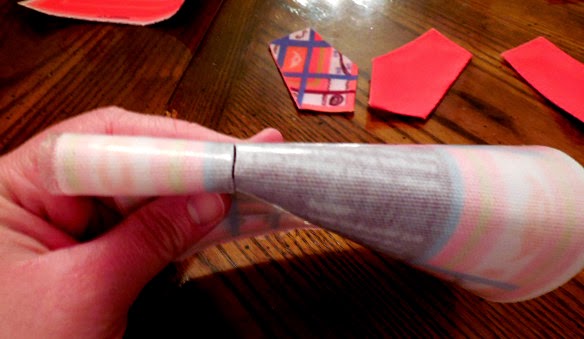
Here I am rolling out the Thermoweb to determine where to cut it - just cut what you need, making sure that all of each panel is covered, including the seam allowances. Making sure that Heat n Bond gets ironed to the seam allowances helps, so when you fold your seam allowances under to the back, this helps both seam allowance flap and main part of the panel to stick together. Just use your fingernail bed to burnish the 2 to stick.
These are pieced Heat n Bond ironed onto the back of the fabric fat quarter, where need be, so you don't have to cover the whole fat quarter.
You will cut around the OUTER edge of all panel part patterns, making sure that you allow for the lighter colored seam allowance to surround the main panel. You will cut all of the corners away at as close to 45 degrees as possible, by eye. You have 10 pattern part panels, so do this for all of them, also, make sure that you cut the center out of the frame front border panels, making sure that you leave a seam allowance to be folder under on the inside of them. Then cut along lines at the inside corners, eye-ing the cutting as close to 45 degrees as possible. Here you see the FRONT strut leg panel. 3 of corners are cut at close to 45 degrees. You will see 2 corners cut slightly differently. Just follow the cuts shown in the photo, the cuts are close the inside pattern panel outer edge, following the lines of them, for those notches. Do this for the other 3 remaining strut leg panels.
Here they are, with checking to make sure the panels are the same size, with panels fitting within the main panel pattern, as seen.
Showing the 4 strut leg panels ready to have their outer edges sewn, seam allowances folded under - also seen is who the fabric transfer strut leg board pattern fits small enough to go inside the finished strut leg pocket, on the left
all nice and evenly sized, 2 panels that make the front strut leg panel to far left & 2nd, 2 panels that make the back strut leg panel 3rd and far right
on the FRONT FFB panel, follow the line where the dark reddish brown center meets the pink seam allowance, fold panel in half like shown, and cut a slit, follow the line cutting out the center. Then cut into the inner corners with your embroidery scissors, along lines shown on panel on the front. Do this for all 4 inside corners. Do this for BOTH FFB panels. Make sure that outer excess fabric corners are cut away, too, for BOTH FFB panels.
showing the center being cut out of the 2nd Inside FFB panel, and then cut out the fabric strut leg pattern for the board along its lines, outer corners cut away, shown
showing 2 FFB borders with seam allowances folded under, ready to sew each of them, individually, both outer and inner edges
showing 2 FFBs, 2 EASEL BACK PANELS, 2 FRAME MIDDLE PANELS, ready to sew to outer (and inner) edges down
all 10 panel part patterns ready to sew their outer (and inner) edges individually, also the fabric pattern for the strut leg board on left
sewing the outer edge around the FRONT FFB, then sew down the inside edge - do this for both FRONT FFB and 2nd Inside FFB
showing the inside edge of the FRONT FFB panel being sewn down
on the other side, follow the light pink line shown on 3 side of the 2nd Inside FFB fabric panel, and straight stitch along the line, flip it over - follow and stitch along this line, with the FINISHED FRAME MIDDLE PANELS already sewn together to each other. This will be stitched to the finished FM panels - this will make the photo pocket - also, make sure that THIS SIDE, the back is stitched UNDER the FRONT FFB panel, and ABOVE the finished FM panels
getting ready to sew the joined / sewn FFB panels, inside edges sewn together, TO the finished FM panels
Readying to sew the 2nd Inside FFB to the finished FM panels - start 1/2" from the top, following the stitch line that you are following - pin straight pins 3 on each side, pin the 2 sides and bottom panels together, to hold the panels in place
Make sure that you fold back the FRONT FFB panel, as you sew the 2nd Inside FFB panel to the finished FM panels
showing 2 panels sewn for both the finished FRONT strut leg panel and finished BACK strut leg panel
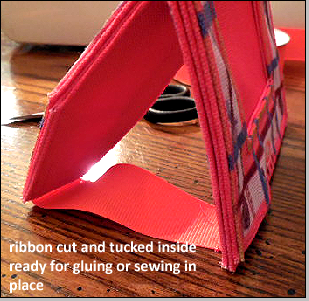
ribbon length sewn to top of the BACK strut leg panel - can tuck inside between the 2 layers that make the back strut leg panel, if you want, alternatively
sew ribbon along right and bottom edges, but make sure ribbon's right edge is within the strut leg panel's main space
front strut leg panel sewn on top of back strut leg panel, with ribbon in between - ONLY SEW along top, angled right side, down, to bottom, across bottom, then STOP - leave an opening on the left angle side for the removable strut leg board that slides in and out!
Here is the FINISHED, joined and SEWN EASEL BACK PANELS with it's top buttonhole area cut out, using the embroidery scissors. Make sure that the STRUT LEG POCKET LINES UP TO THE ART ON THE EASEL BACK, and then SEW along the TOP of the STRUT LEG POCKET, to the FINISHED EASEL BACK PANELS
turn the easel back to the left side facing to the top, strut leg pocket sewn on, backstitching at both ends of top strut leg pocket, shown poking the embroidery scissors into the line where the button hole space is, and cut around the dark reddish brown area's outer edge
straight stitch close to the edge of the cut hole, then follow that line with a zig zag stitch, making sure your machine is set to zig zag function, stitch length 1, stitch width between 3 and 5, and zig zag 2 or 3 times around the holes.
NOW - SEW the finished EASEL BACK PANElS - WITH STRUT LEG POCKET'S TOP EDGE SEWN TO EASEL BACK - SEW THE 3 OUTER EDGES OF IT, the LEFT, RIGHT, and BOTTOM OUTER EDGES to the outer edges of the joined / sewn 2 FFBs to FM panels - MAKE SURE that you SEW on the FRONT, the FRONT OF THE FRONT FFB side of the frame - that side needs to look the best - it's the front of the frame!
However, leave a little pocket space along the bottom right, where the EASEL BACK PANELS are sewn to the FM PANELS - this is where you will tuck the other ribbon end inside, to finish the frame
stand the frame up to determine how much to pitch the strut leg pocket out, pulling the ribbon end out and under the frame, as shown - pin on BOTH sides of the main part of the frame, on the ribbon - this is where the ribbon comes out showing out of the little pocket on the bottom of the frame- you will push and tuck the ribbon into the little pocket, cut the excess ribbon away, leaving 2 inches to tuck into the pocket on the bottom, pulling ribbon until the INSIDE pin buts up against the tiny opening on the bottom. Remove pins. Hot glue or stitck in place
Ready to finish, ready to glue, or in my case, I sewed the little pocket and ribbon together
Ready to hot glue inside the pocket on both sides of the ribbon, inside the pocket -or sew this opening shut, if you can
TIP:
dab tiniest amount of hot glue to inside corners, and push glue from front to back inside - this finishes the inside corners of the picture window of the frame
finish all frayed outer corners with dabbing the tiniest amount of glue, use the nozzle head the "nurse" the glue neatly - this finishes the frame, makes it look clean!
This frame, as with all of my fabric picture frames, are completely washable. Just place the frame inside a lingerie bag, place that in a cold water, delicate cycle, using mild detergent. The fabric washes well. Even with pigment based ink used, the ink did not rub off on my fingers, and no ink washed out in the washer. To dry the frames, just place the frame on a towel, standing up, to air dry - because of the Heat n Bond glue backing the fabric panels, I think that the dryer may be a little too much, however, I did test a ribbon roses and leaves, washable, satin photo frame in the wash, and then put it in the dryer on the lowest temp for 15-20 minutes, and it was fine, and there was a LOT of glue in that frame. I guess, when in doubt, keep it out ...of the dryer ...just in case.
And there you have it! One way to use Zazzle custom fabric! I truly feel that this is the beginning of an amazing partnership, or partnerships! One, between Zazzle and Manual Woodworkers, creating textiles, specifically for artists, quilters, designers, crafters, for us to fully utilize all of our skills, and in turn, stemming from this, more creative capabilities are opened up for new textile projects, products that no one has yet to realize. These are truly great fabrics, thick enough for art and durability, function and aesthetics married for glory. Another partnership is made between artists, Zazzle, and Manual Woodworkers, with yet another awesome creative option put out there, for all to reap rewards.
Thank you for checking out my tutorial on how to make washable, fabric photo frames, using the new Zazzle custom fabric! I really appreciate you reading, and buying my fabric patterns, for buying my sewing pattern downloads, and for buying my art! If you wish to buy any fabric, please go to
http://zazzle.com/fabricatedframes/fabric
To buy my sewing pattern downloads, $2 to $5 each, go to
http://craftsy.com/user/2496069/pattern-store then print onto paper for paper patterns transferred to Thermoweb Heat n Bond as pattern backers, OR June Tailor, WASHABLE inkjet printer fabric sheets, sold at JoAnn Fabrics or online at
http://joann.com
Thermoweb Heat n Bond, both Lite and Ultrahold can be bought at JoAnn Fabric,s Michaels, AC Moore, and online at
http://thermowebonline.com
More links below to purchase supplies and tools:
http://www.thermowebonline.com/c/sewing-quilt_iron-on-fabric-adhesives_no-sew-ultrahold Heat n Bond Ultrahold
http://www.thermowebonline.com/c/sewing-quilt_iron-on-fabric-adhesives_sewable-lite Heat n Bond Lite
http://www.joann.com/search?q=therm-o-web Thermoweb by the yard
http://www.joann.com/search?q=toldi%20lock fuschia large roll of thread
http://www.michaels.com/10407676.html#q=heat+n+bond&start=1 Heat n Bond 5 yard roll
http://www.joann.com/offray-grosgrain-ribbon-7-8in-wide-18-feet/prd37938.html#start=24 ribbon
THANK YOU!
Kristie
http://zazzle.com/fabricatedframes/fabric?rf=238001022235983905
download ebook with printable paper sewing patterns for making 6 sizes of picture frames, both washable, sewn AND NO SEW, NON WASHABLE frames for $7 at
http://www.lulu.com/shop/kristie-hubler/fabricated-frames-instructions-on-making-fabric-photo-frames-nonwashable-and-washable-sewn-fabric-photo-frames/ebook/product-17380339.html
_______________________
My work can be seen on these sites, plus here you can connect with me, below:
fabricatedframescom@gmail.com
Fabricated Frames washable fabric picture frame sewing pattern and tutorial was featured in Sew It Today magazine, issue 11, August / September issue, out on newsstands, in Barnes and Noble, in Joann Fabrics, on 6/24/14, page 55-59, titled "Framed", featuring Fabric Editions / Fabric Loft "Trapeze" collection, chevron and large medallion, available in Target - preview at http://sewittoday.com/issues and http://sewittoday.com/designers
washable, sewn and no sew, fabric:
picture frames
costume jewelry brooch pins, button, badges, etc.
kitchen oven mitts- glove style and house shaped mitts
holiday tree ornaments / door hangers
dog accessories, like t-shirts, jackets, and bellybands for "accidents"
$2-$5 sewing pattern download printables and $5-10 contact paper patterns available w/ or w/o my art formatted to print onto inkjet fabric
fabricatedframes.com is a proud partner friend of Thermoweb and is featured on http://www.thermowebonline.com/k/friends-of-therm-o-web-heatnbond/Company+Info.Our+Friends
http://www.lulu.com/shop/kristie-hubler/fabricated-frames-instructions-on-making-fabric-photo-frames-nonwashable-and-washable-sewn-fabric-photo-frames/ebook/product-17380339.html $7 eBook with pattern download printables to make washable sewing & non washable no-sew fabric photo frames, six sizes each kind at Lulu.com
photo frames with removable easel back and strut leg boards that slide in & out of their pockets, plus pocket for photo and photo sleeve made out of acid free, clear sheet protector from the office supply store
brooches are washable, have a back panel w/ 1 or 2 holes for military clutch or bar pin back to stay in place, front and back panel make pocket for pin back to slide in and out of
dog accessories currently for Yorkies and pugs
dog jackets have velcro closure
bellybands with pockets for pads or cut up diaper cloth and elastic for Yorkies and pugs
t-shirts for Yorkies
art and product licensing
http://www.craftsy.com/user/2496069/pattern-store
http://patternspot.com/designers/19355-kristie-hubler
my art on rugs, duvet covers, shower curtains, curtains, frames, oven mitts & more at http://cafepress.com/profile/KristieHublersCafepress
my art on kitchen towels, messenger bags, nail decal art, guitar picks, dessert treats, jewelry, pillows, and more at http://zazzle.com/fabricatedfames
my art on duvet covers, shower curtains, 2x3 feet and 4x6 feet area rugs, pillows, canvas, posters, totes, and clocks at http://society6.com/KristieHublerArt
I am on theKase.com! http://www.thekase.com/EN/designers/kristiehubler smartphones and tablet cases with my art on them, on theKase.com and sold in stores
Canvas, prints, cards, smartphone cases, art licensing for print, media, tv, and movies at http://fineartamerica.com/profiles/kristie-hubler.html
advertise your banner link for your site or business for $5/yr, $1/month on fabricatedframes.com
subscribe to fabricatedframes.com, and get a free epattern each month for a year, $1/year
fabric pattern designs at http://www.spoonflower.com/profiles/fabricatedframes
http://pinterest.com/fabricframes
http://www.facebook.com/fabricated.frames
https://www.facebook.com/pages/Fabricated-Frames/174748669331
http://fabricatedframes.blogspot.com
https://plus.google.com/101545339143403332115
http://kristiehublerfabricatedframescom.tumblr.com
http://youtube.com/user/fabricatedframesCom
http://kristiehublerartistproductdesignerwithfabric.wordpress.com
http://www.flickr.com/photos/88805890@N08
http://twitter.com/FabricFrames
http://twitter.com/FabricPdfCrafts
http://twitter.com/ArtHomeTextiles
http://twitter.com/KrisHublerArt
Author of "Fabricated Frames: Instructions On Making Fabric Photo Frames", 62 pgs, 6 patterns, $11 at
http://lulu.com/spotlight/fabricatedframes
pdf ebook with sewing pattern downloads for $7 at http://www.lulu.com/shop/kristie-hubler/fabricated-frames-instructions-on-making-fabric-photo-frames-nonwashable-and-washable-sewn-fabric-photo-frames/ebook/product-17380339.html both are also on Amazon at http://www.amazon.com/Fabricated-Frames-Instructions-Making-Fabric/dp/0557327792
http://linkedin.com/pub/kristie-hubler/8/714/792
http://www.shapeways.com/designer/KristieHubler metal and plastic 3D necklace pendant or charm jewelry, based on my tiara art
______________________
You can see all of the fabrics now offered on Zazzle at
http://zazzle.com/fabric?rf=238001022235983905
THANK YOU!