HI crafters!
So, you always wanted to make or have fabric photo frames, BUT, the ones on the market (in case you haven't visited my site at http://fabricatedframes.com, my little remote corner on the internet, showing you washable, fabric photo frames and their sewing pattern downloads) - they weren't washable! Or, you wanted to make them yourself, BUT, you don't know how to sew! Well, I'm here to help! I created / invented the washable, NO SEW, fabric picture frame, for 6 sizes. I've been making fabric photo frames for 15 years, I've had trials along the way, but this year, in honor of National Craft Month, I finally came up with a way to make them, so that YOU can make them!
Below is the photo and text, step by step tutorial, along with links to watch the youtube video tutorial at
http://youtu.be/EtX_8QF_28M , links where to buy the supplies and tools, and more!
The six sizes of NO SEW, washable, fabric picture frames / photo frames, will be soon up on Craftsy.com to download and make your own at
http://craftsy.com/user/2496069/pattern-store for photo sizes:
1 1/2" x 2 1/2"
2 1/2" x 3 1/2"
4x6"
two for 5x7", 6 3/4" x 8 3/4" oa., and 8x10" oa.
8x10"
In the video and the photos, you will see me using the new fabric available to buy at
Zazzle.com/fabric - in combed cotton fat quarter size for $11.95 - I had my Paris Eiffel Tower inspired pointillism art repeat pattern at
http://www.zazzle.com/paris_eiffel_tower_inspired_pointillism_fabric_2-256525211195273443 - the fabrics available are pima cotton, polyester, linen, 7 fibers, from $6 9x9" swatches, fat quarters, and by the yard. They offer larger than normal widths, starting at 54" wide, 56" wide, 58" wide, and 60" wide, depending on fiber. I've been using various fibers for the past month from them, and I'm telling you, they are worth the money! Plus, they have sales at Zazzle, promocodes, so check out my Facebook and http://twitter.com/fabricframes tweets for daily savings announcements!
All you need for the frame for the 5x7" photo, that will measure 8x10" when finished, is a fat quarter of not too large a patterned fabric, this is from Zazzle, shown, with my art in repeat. A fat quarter is enough for the: front panel, I call it the FRONT frame front border, with the picture window, or photo area in the center, the facing out easel back panel, and the front strut leg panel for the strut leg pocket, The other 7 fabric panels can be an inconspicuous solid color, 1/2 yard, something that blends in, that recedes. I used a light sky blue solid for the other 7 panels. This allows for your print design to stand out.
Other supplies and tools needed:
Thermoweb Heat n Bond Ultrahold (or Heat n Bond Lite or Featherlite - any will do) - Ultrahold is acid free, perfect for photo frames- the others are not - it is an iron on, paper backed fabric adhesive, fusible web, that gets ironed to the back of the fabric panel patterns. You can cut a piece large enough to cover the seam allowance AND main panel part pattern, follow the directions below, to make and transfer those patterns. This supply is KEY. It gives structure to the frame, and allows the frame to stand - buy a 17" wide by 5 yard roll fr $8.99 at Michaels or michaels.com but use a store coupon or sale, to save money, I get mine for as low as $4.49!
ribbon:
2 kinds
1/8" wide, skinny ribbon (I found a use for it!) 2 yards long - this gets thread through the holes that you will cut out, which print out on your pattern downloads, strategically placed and marked on the patten, that connects the 2nd inside frame front border or 2nd Inside FFB for short, to the 2 frame middle panels, or FMs
1 1/2" wide by 9" long ribbon - this connects the strut leg pocket, between it's 2 layered front panels, and the 2 layers of easel back panels, the bottom right corners of them, to make the strut leg pocket pitch out, allowing for the frame to stand on a table or shelf.
pack of acid free, clear, sheet protector pages: 1 for the protective photo sleeve cut to the size of the photo, the rest you use to transfer the pattern panel parts lines, tracing over both the main panels AND their seam allowances with a Sharpie marker, turn over, marker side down, and transfer lines onto Thermoweb Ultrahold, but cutting around edges of clear patterns, and tracing the outer edges.
pack of straight pins - no, you are not sewing anything lol, these just help you keep things, panels in place, to line up panels, hold them together ...or you could use clothes pins, safety pins, clips, doesn't hurt to have these on hand, though
mat board or cardboard - for the removable, slide out easel back and strut leg boards -for this size frame, use a 14x9" piece, cut the easel back board to 7x9", and the strut leg board pattern will be in the download, true size - Michaels sells the mat board for $5 for a 20x30" piece, AC Moore sells a 32x40" board for $8, JoAnn Fabrics superstores sell it in 8x10" scraps in their framing department for $1 to $2 each, buy 2 scrap boards if you go to JoAnn Fabrics superstore -t can get cut with a pair of paper scissors, a craft store paper trimmer if using a piece small enough, or what I use is a utility knife, what they use for cutting carpet and home repair. Handy to have around the house, $4 to $5, and the replacement blades are around $20 for a pack of 100 double sided blades
15-20 hot glue sticks $2 to #4 per pack
low temp hot glue gun $4
embroidery scissors, for poking and cutting the circle holes, 7 holes on 3 panels, and cutting into the corners of the picture window
fabric scissors
paper scissors - cut your Thermoweb with these, along with your clear sheet protectors, unless you have a paper trimmer, that helps a lot
paper for your printer, ruler, pen or pencil, Sharpie marker
iron
PRACTICALLY EVERYTHING CAN BE BOUGHT IN AN ART SUPPLY, FABRIC, QUILT, OR CRAFT STORE! It's insanely wonderful!
Michaels michaels.com most supplies, Thermoweb 5 yard roll, mat board, ribbon, scissors, acid free scrapbook sheet protectors $4.99 a pack of 12, fabric
JoAnn Fabrics joann.com - fabric, Thermoweb by the 1/8, 1/4, 1/2, 1/3, 2/3, 3/4 & yard increments $1.99/yard, ribbon, mat board, scrapbook sheet protector pages, scissors, glue sticks
AC Moore acmoore.com - mat board, ribbon, Thermoweb by the roll, glue sticks, glue gun, fabric
Walmart walmart.com - many of the supplies and tools, believe it or not, amazingly, acid free sheet protector pages $3.49 - $4 50 page pack
Target target.com - fabric by Fabric Editions - called the Fabric Loft, I worked with it for my frame tutorial in Sew It Today magazine last yeaar! also acid free sheet protector pages 50 pack $5
Walgreens for acid free sheet protectors
Here is the legend, for the parts of the frame:
FFB - frame front border, area of frame around the photo or picture window (PW) -2 ffb's, front FFB and 2nd inside FFB - 2nd inside FFB gets connected to the 2 frame middle panels, to make the photo pocket - 2 panels
FM- frame middle panels - 2nd inside FFB connected on one side with ribbon through 7 holes, hot glued to 2 easel back panels on the other side - 2 panels
EB - easel back - gets strut leg 4 layered pocket attached to it at the top portion of the strut leg pocket - 2 panels
strut - leg, pitches out, allows for frame to stand upright, connects at bottom right to easel back panels, between layers of EB
Pockets on the back of the frame for removable, slide out, easel back and strut leg boards. Pocket for slide out photo and protective sleeve. Holes on top and side edge, centered, for hanging frame vertically or horizontally.
INSTRUCTIONS TUTORIAL:

Here are the 3 Ultrahold Heat n Bond patterns, placed over the Paris / Eiffel Tower inspired repeat pattern fat quarter print Zazzle fabric - figuring out the layout, what shows on the main part of the finished pattern panel, where the seam allowances are - placement of the panel - remember, you have to gauge where the pattern lays, so that it is centered horizontally and vertically, AND make sure that print fabric front strut leg panel's pattern is aligned with the bottom right design of the facing out print easel back fabric panel. This is tricky. My tip would be to take the clear sheet protector pages, and use them to trace over the Ultrahold Heat n Bond patterns that you created / transferred from your print outs from the download, INCLUDING seam allowances, if possible. So trace over the main panel, and add a seam allowance. Do this for all 10 panels, 6 rectangle panels and 4 strut leg panels. Take the clear plastic patterns, and lay them over the fabric, again, making sure the design is centered vertically and horizontally, in a pleasing manner to your eye. Plus make sure that the right bottom corner of both the easel back and strut leg pattern, with bottom, 90 degree right angle in the bottom right corner, are aligned, design wise, eyeball it best you can.

For the 3 fabric print design panels, front frame front border, easel back panel, and front strut leg, place & push pins on both sides of all corners of each clear pattern (Thermoweb pattern is showing) - see how the pins are perpendicular to each other at both sides of the corner of the pattern panels. Then, push a third pin through both pins, for all corners, pushed all the way through on the back, turn over your fabric to the back, and lay your Ultrahold patterns within the straight pin boundaries that you placed. This helps keep everything even and the way you want them.

Here is a close up of the strut leg Ultrahold pattern laid over the back of the print fabric within the pin boundaries. You can see that the little 1/2" slide that gets removed, is in place still, but not ironed down. You cut this piece away after cutting out the whole strut leg Ultrahold Heat n Bond pattern, BUT, make sure to place it between the top and bottom panels, to help you get everything piece in place, top and bottom - THEN pull it out, and iron down the top and bottom pieces of the strut leg Heat n Bond pattern
Here is the top and bottom strut leg Ultrahold patterns ironed down
Here are the excess corners cut away at all 5 corners of the strut leg fabric panel, after Ultrahold is ironed to the back. 3 of the 5 corners can be cut at as close to 45 degrees as possible, just turn the piece to where the corner is centered pointing up in front of you, and cut across. For the "obtuse" angles, those wide angles at the bottom left and center right, follow the line edges of the Ultrahold pattern, to cut as if you are following those lines, but make sure not to cut too far in
This is the print side of the front strut leg panel, facing up, excess fabric corners cut away
the 3 photos above are how to handle the Thermoweb for the front print frame front border (front of frame facing out) - just center the Thermoweb pattern within the pin boundaries made, iron it down, from the center out to the corners and edge, then cut away the 4 corners excess fabric in the same way you cut the 3 corners for the strut leg fabric panel
the print fabric easel back fabric pattern with fusible web Ultrahold paper side up, print side down, corners cut away
here is the print side facing up for the fabric print easel back panel
Below are the panels with the Thermoweb ironed down, corners cut away, seam allowances cut down to manageable widths between 1/4" and 1/2" all around, AND showing the 3 panels with holes, for the:
2nd inside frame front boarder and 2 frame middle panels, that make the photo pocket for the photo and its protective clear sleeve to slide out
Make sure that you transfer the holes, the circles from the print outs, onto the Ultrahold Heat n Bond, in the correct spots. There are 7 holes on the 3 panels, 3 on the bottom, and 2 more on both vertical sides. The 1/8" wide long ribbon gets thread through these holes, connecting all 3 fabric & Ultrahold fused panels


you poke and cut out the holes AFTER you have the Heat n Bond ironed to the back - the Heat n Bond "seals" the edges of the circle hole, so it doesn't fray, just use your embroidery scissors -it should take between 15 minutes and half hour tops to cut out all holes. Place your index and middle finger behind the hole on the back, paper side up with hole drawn facing up, poke the pointy end of your embroidery scissors through, GENTLY, and aim at the point going between your index and middle fingers, do this slowly, and you can feel it as you go, carefully, you will feel the pressure of the poke between your fingers, so your fingers can move apart slowly and gradually as you push the pointy tip of the scissors through
also, and this is to help you, it is just a tip, I found that if I cut away a notch on the seam allowances, around the holes, this keeps excess fabric from pushing through the holes, while you are trying to thread the skinny ribbon through. I find I do this more so for the inside seam allowances of the picture window on the 2nd inside frame front border, than the outside seam allowances, but some narrow frame front borders, especially on the smaller frames, you will have to cut more notchings. Just cut in but not to the edge, on either side of the hole on the seam allowance, then across to make a "square" like notch - don't cut all the way to the edge though.
Here are the 4 strut leg fabric panels with Ultrahold ironed down, and the slice of take away Thermoweb between the top and bottom panels removed before ironing down. You will see the top and bottom are shiny because of the "glue" the fabric adhesive of the Ultrahold Heat n Bond, and the middle part, where the bend will be is just bare fabric, no Thermoweb is ironed to it. This helps the 4 complete strut leg panels bend, so that the strut leg pocket can pitch out, and allow for the frame to stand upright.


I'm ready to iron down the seam allowances to the back of the fabric, using my iron, below - first the frame front border panels, front print, and 2nd inside ffb - put the pointy end of the iron between your index and middle fingers, and iron from the center out, for all inside and outer seam allowance edges. Use the edge of the Thermoweb to guide your fold overs of the seam allowances, you will feel the change in "substrate", the edge of the fabric adhesive Heat n Bond, use your fingernails (or what you have for fingernails in my case, as I cut my nails short lol) to burnish the seam allowance edges. For frame front borders, after cutting away the 4 outer corner excess fabric pieces away, cut out the center, using the inside seam allowance inner edge line that you transferred to Thermoweb, then cut along the 45 degree inner lines into the inner picture window corner, the inner line that allows the photo to show through, using your embroidery scissors, carefully, not cutting too far into it. Fold the inner seam allowances under to the back, burnish along the edge crease - the sets a line pressed into the Thermoweb, so when you pull away the paper, you will see a crease indent line, to fold your inner seam allowance along


After you've ironed down your seam allowances, if your inner and outer corners look like they are fraying, just use the tiniest bit of glue from your hot glue gun and the nozzle to "nudge" the frays to the back of the panel. I sometimes dab a bit of glue, from the front side, at each corner, and push the glue from front to the back, to "finish" the corners - it is the professional way to make them look, plus they won't fray, when washed. A lot of manufacturers don't do that with their fabric picture frames, they'll just cut into the corners, and not cleanly, some look like they would tear if you touch them. I "finish" my inner corners, as an added value.
Below are photos of the 3 inside finished fabric panels:
2nd inside ffb
2 frame middle panels
with holes cut out, seams notched around holes, seam allowances ironed down, ready to align and thread the 1/8" skinny ribbon through
this makes the photo pocket
make sure that you have ironed both frame middle panels together, glue sides facing each other, and holes are aligned, using the circle holes on the patterns strategically placed ( the panels should mirror each other), and place the 2nd inside ffb on top of the joined, ironed together, frame middle panels, the fabric side of the 2nd inside FFB face down, Ultrahold glue side facing up, making sure the holes are aligned - if you need to, use straight pins to keep them aligned and in place, or clothes pins, or paper clips even. I start at the top left with the 2nd inside ffb on top, glue side up, take the ribbon and from the back, push through to the front, up and over into the next hole, going through all 3 panels as you do this, and up and under into each hole, until you get to the top right corner hole. Then, go back over then under in the opposite direction, going over what went under, and vice versa, until you get to the other top left hole, tie on one side on the front where the 2nd inside ffb is glue side up, hot glue around knot on fabric panel away from the hole about 1/4" or so, then poke ribbon back into the hole, and tie a knot on the other side, and glue around the knot, 1/4" away from the hole, then cut excess ribbon away, down to 1/4" or 1/2" and glue that ribbon end down, using your nozzle and a dab of glue
take the long piece of ribbon and
Now you will join the finished panel parts with hot glue, using your low temp hot glue gun
Start with joining the 2 ffb's together, the two frame front border finished panels. Don't be like me, showing me joining them AFTER I connected the 3 panels with holes together. Assemble and hot glue the inner picture window edges of both frame front borders together BEFORE connecting the 2nd inside FFB to the 2 frame middle panels. It's just easier! lol
In case you didn't do that, it's ok, you just have to be very careful, with gluing your 2 FFB inner picture window edges together. Have clear, calm head, lol. Lay the print fabric, front side frame front border (front print FFB) on top of the 2nd inside FFB, which is Heat n Bond glue side up at this point, align your panels, use straight pins, clothes pins, whatever helps you hold them together and aligned, and what I do is, I have the pieces turned so the top of the frame is turned to the right, to my right, fold up the top front ffb, and start at the top horizontal edge of the picture window, which is vertically to my right at this point, and start at the corner, placing a bead line of glue down, to the center of the line, within the edge, but don't use too much, and press down carefully and gently, continue hot gluing to the next corner, carefully, and gently. Do this for the remaining 3 inner picture window edges, making sure hot glue doesn't seep out too much, catch it as you go, as you push out glue, picking out what hardens as best you can in case you couldn't catch it. Just try to be as neat as you can. Even I have my days. lol
Since you have the 2 ffb's and 2 frame middles connected, now you can hot glue the outer edges, inside of course, close to the outer edges, inside, and press the edges down
MAKE SURE THAT YOU LEAVE AN OPENING BETWEEN THE 2ND INSIDE FFB PANEL AND FRAME MIDDLE TOP PANEL FOR THE PHOTO AND ITS PROTECTIVE, CLEAR, CUT UP SHEET PROTECTOR PAGE, PHOTO SLEEVE, CUT TO THE SIZE OF THE PHOTO!!! You can glue down the rest of the edges, just make sure that that opening is clear for the photo pocket!
Now, you can join your strut leg panels to make the strut leg pocket, that gets attached at its top to the easel back, print designs aligned
First, and you will see in photos below, find your front, print design, strut leg panel, and place that on top of the corresponding, opposite direction strut, labeled strut leg panel 2 in the download, before ironing them together, and gluing down their outer edges, take the wider, 1 1/2" wide ribbon, and place the one end inside at the bottom right as shown, with at least 1" inside. Iron the panels together, glue the outer edges close to the edge on the inside. This makes your finished strut leg front facing out panel.
Do the same with strut leg panels 3 and 4. This makes your finished strut leg back panel.
Now, place the finished strut leg front panel and place it on top of the finished strut leg back panel. Use pins or clothes pins to hold them together. Hot glue the top portion, making a glue "box", adhering the tops of both panels together, THEN hot glue across the TOP EDGE of the bottom portion area of the strut leg bottom portion - this seals the top portions, secures them. Then hot glue down the remaining right angled side, then down the vertical right side, then across the bottom. STOP. Make sure that the angled, left side is open for your removable strut leg board
You will note that the other end of the ribbon is dangling out. This gets tucked between the 2 easel back panels at their bottom right corners.
Making sure that both holes, vertically and horizontally placed, and centered at the top and side, are cut out, the panels are aligned, holes match up - if your inside facing easel back is peaking through the hole on the print side facing out easel back, just cut into the hole, and cut away excess fabric peaking through the hole, as neatly as possible. Iron the panels together, glue sides inside, fabric print facing out - EXCEPT for the bottom right corner of the print side facing out, leave that un-ironed about 2" x 2" from the corner. You will place the other end of the wide ribbon here, gluing inside on either side of the ribbon, best you can. For now, just iron the panels leaving that corner un-ironed.
Below, you will place the strut leg pocket, with dangling ribbon end hanging down, on top of the joined easel back panels, aligning the print design, so the patterns match as best as possible. Play with it a bit, so that the design matches, use straight pins or clothes pins to hold the bottom right corner in place, fold back the top portion of the strut leg pocket, and make a hot glue "box", with an X, if time allows (and no breeze), and press the top in place, as best aligned to the print as possible. WHEW! lol It had me nervous. So, be clear minded, and calm when doing this part.


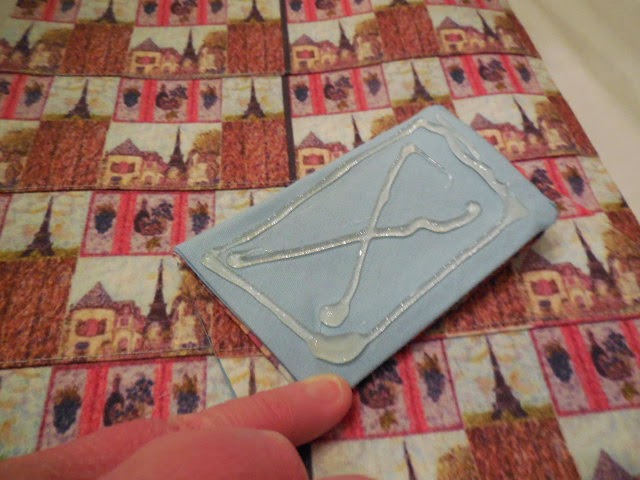

Now, you will stand the frame up, strut leg pocket pitched out, and push the ribbon under the frame and out to the front. To determine the pitch, play with the strut leg pocket so that it stands alone without any help. This is why the Thermoweb Heat n Bond Ultrahold is SO important, because this fabric adhesive "substrate" acts like an invisible structure, that helps keep the panels straight, aligned, crisp, and strong. That may sound corny, but I've used Ultrahold for 15 years, and it really, really helps keep the frame's structure and rigidity!


Another tip is, to help in determining how far to pitch the strut leg pocket out, is, before I deal with the connecting the other end of the ribbon, I cut my easel back board, and strut leg board out, first. You can use paper scissors, you can use a paper trimmer from the craft store if the scrap piece is small enough to fit, but I find that using a utility knife, the kind that carpet installers use, electricians use them too, I believe, and I cut the boards out with that. I start at the top of a line made, and aim my eye at the bottom of the line, where I want the cut to finish at, kind of like what baseball catchers do. Then I slide them into their respective pockets on the back of the frame. This helps give weight, realistic placement of all things, and it helps pitch the strut leg pocket out where you want it to go.
Ok, so use straight pins, on either side of where the ribbon is situated under the frame - this helps you determine how far to tuck in the ribbon between the 2 easel back panels- that outer pin butted against the frame front border is your guide, it is the spot of placement for where the ribbon butts up against the bottom edge. Cut away the excess ribbon, about 1-2" from the outer straight pin against the frame front border, and tuck it inside, making sure that it doesn't pop out on the side. Glue the opening shut, best you can, calmly, trying to not allow for too much glue to seep out. Stand your frame up.
There! You are finished! It took me about 2 hours to complete. I'd give yourself 2-3 hours. If you get antsy, or frustrated, STOP. Continue it another time. It's not hard to make. It's just a matter of following the steps, reading, remembering, fully absorbing the tutorial. Make sure to watch the video tutorial, on youtube at
http://youtu.be/EtX_8QF_28M before digging in and starting the project. That way, you get a jest for the project. I had fun doing this, and I hope that you do, too! It really was exciting, seeing this project as a success! I ALWAYS wanted to make a pattern download for crafters, to make their own, YOUR own, WASHABLE, fabric picture frame, for all sorts of sizes, and I'm very excited, after a few trials and errors, to find a way to make it happen! I make them sewn, but I know that there are crafters out there who don't sew, so ...lol :D, along with the video tutorials and the other sewing tutorial on my blog, combined with THIS tutorial, I really hope that I did the job, providing you with the accessibility, and hopefully ease, for you to make your own washable, fabric photo frame! I love what I do, and I am INCREDIBLY PROUD of this invention, the washable, no sew AND sewn, fabric photo frame, this craft, for others to create! This has been 15 years in the making, and it's done! :D
Now, I'm off to making the pattern downloads, collating the patterns to make them printer friendly for you. In the meantime, I have the patterns laid out ON Zazzle fabric, at
http://zazzle.com/fabricatedframes/fabric - just scroll down to find the photo frame craft yard and fat quarter panels. I have different colors. Make sure that you find the pattern panels labeled "sewing pattern" versus "no sew pattern" - they will be labeled in their titles. I have black, gray, and few other popular, trendy colors available, and I am adding more solid colors, AND art patterned prints, as I go, so be on the look out for those. The Fat quarters, starting at $11.95 for combed cotton, have all 10 panel patterns to make a frame for a 4x6" photo. I am making a fat quarter size for the 2 smallest frame panel patterns to be on there. Basically, I'm trying to maximize space usage, yet give the most bang for your buck,. I have panels with 3 sizes on a yard, to make a frame for an 8x10", 1 1/2" x 2 1/2" photo (convertible from tabletop tiny frame, to frame brooch pin with a removable strut leg pocket, attached by hook and loop velcro at the top of the strut leg pocket and bottom right), and wallet sized, 2 1/2" x 3 1/2", perfect for favors, place card frames, for weddings, showers, events, and promos! I have the both sizes, 2 sizes, for the 5x7" size photo on yard. I figured that, by the time you buy the extra supplies and tools, listed here, too, that you would spend that amount anyway, if you do cost of goods analysis, plus these are custom, some with custom art printed, so you really are getting a lot for your money, and Zazzle fabric is top quality, I loved working with it. On top of that, the ink used is pigment based, so it's acid free, the natural fabrics are almost acid free, cotton, and linen, not completely acid free, but these factors do help, when dealing with photos being near them, plus the acid free labeled sheet protectors help. You can use 2mm thick UV glass from AC Moore's framing section, or Michaels, or frame shops cut to the size of the photo. The supplies & tools are listed ON the Zazzle project fabric that I have made, all lines for cutting away corners are marked, some instruction text is printed on the seam allowances, holes are marked, with a line to guide you - this is so that you have as much as possible, with little guess work. I try to give my all. I'm not the type of person who skirts by, does bare minimum, to collect a paycheck. I have too much integrity, and I don't want to dismiss or undermine my customers. So, if you have questions, or tips, PLEASE, let me know, so I can make the best pattern tutorials and downloads as possible. Objective criticism, please. lol :D Thank you all! And PLEASE, have fun with this project! That's why we do this, to go a little further than yesterday, but enjoy ourselves, while doing it!
THANK YOU!
Kristie Hubler, inventor of the washable, NO SEW, fabric picture frame / photo frame, and their patterns
inventor of the washable, sewn, fabric picture frame, and their sewing patterns
LINKS TO PURCHASE / BUY THE SUPPLIES & TOOLS BELOW:
http://www.michaels.com/10407676.html#q=ultrahold&start=1 - Ultrahold 5 yard roll
http://www.joann.com/heatn-bond-ez-print-featherlite-iron-on-adhesive-8.5inx11in-10%2Fpkg/14244891.html - Featherlite EZ Print 10 sheet pack $7.99 at joann.com
http://www.joann.com/heat-n-bond-ultra-hold-iron-on-adhesive-17inx12in/1069806.html#q=therm-o-web&start=18 Heat'n Bond Ultra Hold Iron-On Adhesive-17''x12'' $1.99 before sale or coupon
inkjet printer fabric sheet packs, you can buy the downloads with my art formatted, for all parts, to print onto June Tailor brand, washable, colorfast, inkjet printer fabric sheets - brooches and ornaments use ONE SHEET
buy at
http://www.joann.com/june-tailor-washable-colorfast-printer-fabric-3-pkg/prd12984.html#q=june+tailor&start=18 3 sheets for $9.99 before notions sale or coupon
http://www.joann.com/june-tailor-colorfast-sew-in-inkjet-fabric-sheets-8-1-2inx11in-10-pkg/7568280.html#q=june+tailor&start=3 10 sheets for $25.99 before notions sale or coupon
http://www.joann.com/june-tailor-colorfast-sew-in-inkjet-fabric-sheets-8-1-2in-x-11in-25-pkg/2359131.html#q=june+tailor&start=11 25 sheets for $55.99 before notions sale or coupon
http://www.michaels.com/heat-n-bond-iron-on-adhesive-sheet-ultrahold/10488007.html#q=heat+n+bond&start=4 Heat n Bond Ultrahold 17" by 1 yard paper backed, iron on fabric adhesive, acid free $3.29
http://www.michaels.com/10548610.html#q=heat+n+bond&start=7 Heat n Bond Lite $3.29, 17" wide by 1 yard, paper backed, iron on fabric adhesive
embroidery scissors Gingher brand
http://www.joann.com/gingher-4in-lightweight-embroidery-scissors/6599732.html#q=gingher+scissors&start=29 $10.19 on sale , $16.99 reg. price
http://www.michaels.com/search?q=embroidery%20scissors
low temp glue gun about $4
THANKS AGAIN!


